One-piece steel cavity lintels for masonry cavity walls offer an excellent balance of strength, weight, durability, performance and cost effectiveness. They are easier to detail and faster to install than alternatives like separate lintels and are capable of providing support over openings in domestic and non-domestic buildings alike.
Why are steel lintels preferred for a masonry cavity wall?
Masonry cavity wall construction is the most common construction method in the UK, especially for residential developments. An inner and outer leaf of masonry is separated by an air cavity, which is either fully or partially filled with thermal insulation.
Openings in a cavity wall require structural support for each masonry leaf. A separate lintel used to be the common solution, with two different cavity wall lintels specified (one for each leaf). Now, however, a one-piece steel lintel is preferred. The main body of the lintel sits within the cavity, and a toe projects from the front and back of the lintel to support the outer and inner leaf.

The lintels are designed to contribute thermal performance and moisture resistance at the door or window head detail, as well as the necessary structural stability.
The one-piece lintel also closes the cavity, avoiding the need to specify a cavity closer separately.
What type of lintels are available for cavity walls?
Cavity lintel specification is determined by the build-up of the cavity wall, the size of the opening the lintel has to span, and the load imposed by the structure above. Catnic offers a complete range of one-piece steel lintels to suit standard or heavy-duty applications.
Thermally broken lintels
All lintels for cavity walls come with integral insulation to help reduce the thermal bridging impact of the steel. Where the thermal performance of the lintel detail is particularly critical, the Thermally Broken Lintel (TBL) range guarantees psi values of 0.05 W/mK or lower.
Extreme load cavity lintels
Extreme load cavity lintels are also available. These resemble a conventional steel beam, being an I-profile in shape and not featuring integral insulation. A separate damp proof course (DPC) is required with the extreme load lintels in all cases, because of the difference in shape compared to the standard and heavy duty lintels.
How to install a cavity wall lintel
When installing a cavity wall lintel, proper installation is crucial to ensure optimal performance.
Check out our video on cavity wall steel installation below and read our tips here for more guidance.
Taking measurements
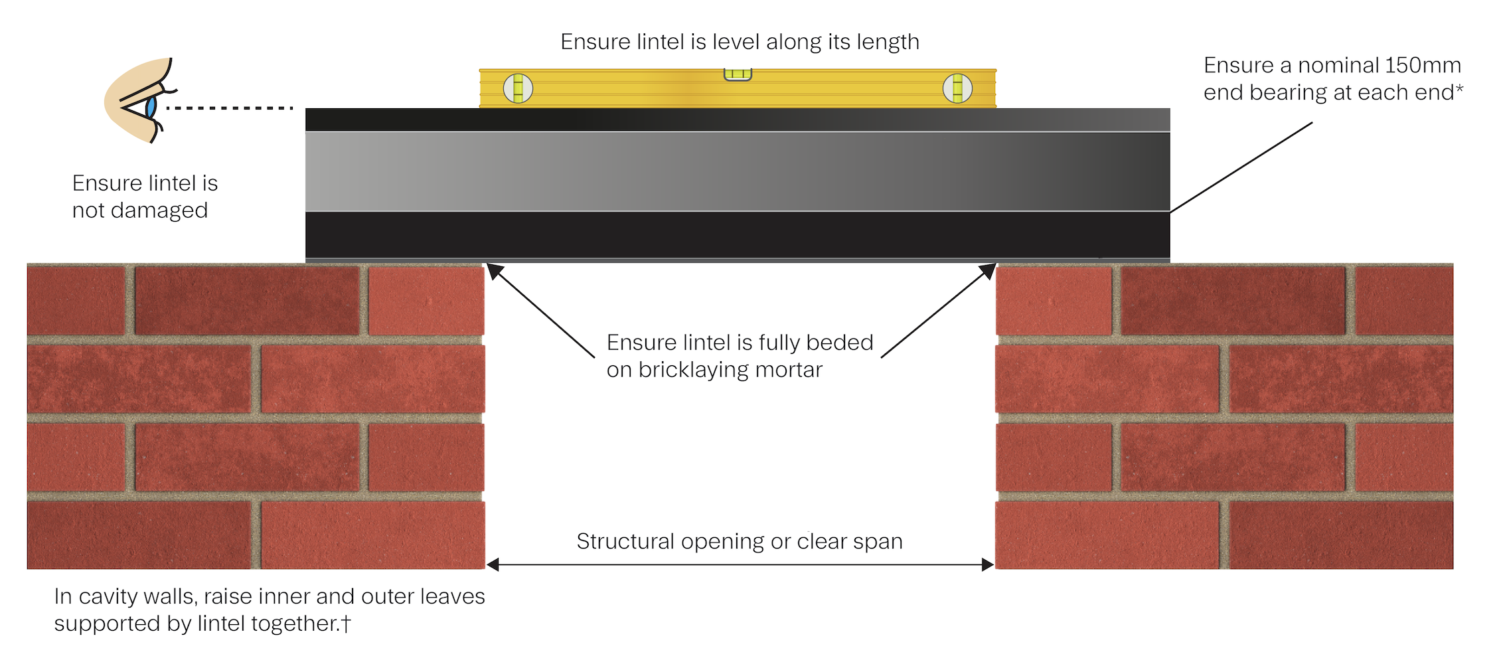
Lintels must be installed with a 150 mm bearing at each end. This means that the total length of your lintel should be the size of the gap plus 300 mm.
The lintel should be fully embedded into bricklaying mortar and equally level across its length and width. Only full bricks or blocks should be used as part of the bearing area, and lintels should not be placed directly onto part bricks.
Choosing the right lintel
Then, comes the choice of which lintel you choose. This will depend on the cavity and opening width, and building regulations standard you’re conforming to.
Read more: Which lintel do I need? Help with choosing lintels
Check for damage
Although rare, sometimes, a lintel can arrive damaged which means they’re unable to be used. We recommend checking over your lintels prior to installation, in case there’s any bowing or cracking in the lintel itself.
Do not use any damaged lintels, as these can compromise the safety and strength of your install.
Ensure everything is level

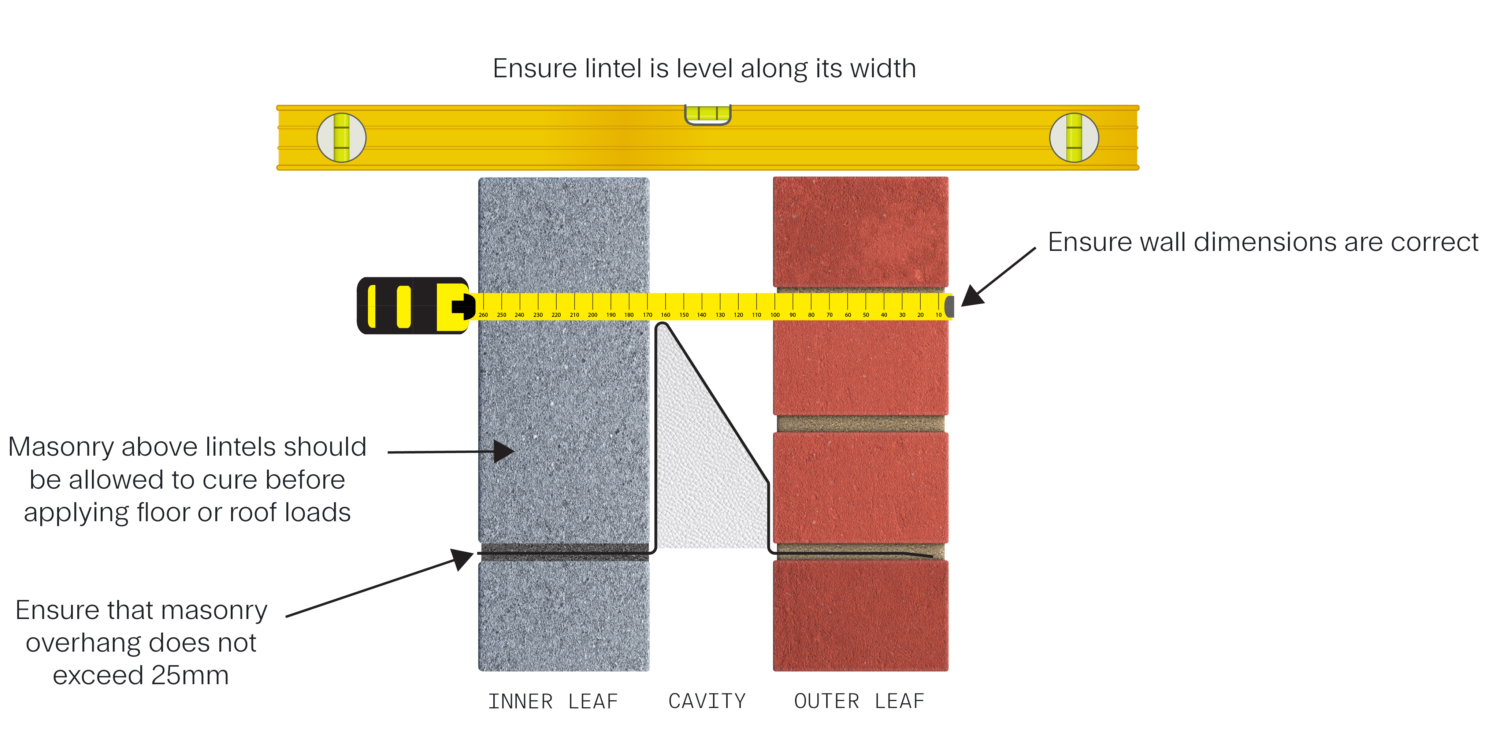
With your measurements taken, lintel material chosen, and damage assessed, now comes the time to start putting everything into place. Install a layer of mortar on top of your wall, place the lintel over the gap, and make sure it’s level using a spirit level.
Be sure to check the level across both the length and width of the lintel.
Install a damp proof course, if needed
We recommend adding any damp proof course (DPC) to your lintel installation after it’s set and level. This will prevent damp from penetrating the wall and causing damage.
Install soffit cladding, if needed
If your installation is taking place in a coastal area, you may want to install soffit cladding for some added protection against the elements, when much of the lintel’s soffit is exposed.
Allow to cure
Before you install anything on top of your structure, like joists or trusses, allow the masonry to suitably cure. This will prevent sagging in your structure, leading to a more secure install.
Need help choosing your next lintel?
The Catnic lintel product selector allows users to narrow the range of available cavity lintel solutions, based on masonry and cavity thicknesses, as well as loading conditions. An appropriate lintel can then be specified for the clear span of the opening and the safe working load required.
Catnic’s lintel product selector tool can also be used to specify lintels for other applications. Alternatively, Catnic has a dedicated technical support team available to assist with any questions or non-standard requirements. Contact us to discuss the details of your project.
More
-
![Coastal property in middle east housing complex, with external render finish]()
- Plaster Bead & Mesh
- Guide
A Specifier’s Guide to Choosing the Right Plasterers’ Beads for Hot, Humid and Coastal Environments
-
![]()
- Plaster Bead & Mesh
- Guide
How to Fix an Angle Bead to Plasterboard


